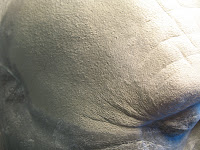
So I have finally finished my silicone aging sculpt. It was broken down into 9 pieces: forehead, back of head, cheeks, ears, nose/upper lip, chin and neck and then finished on 1630(backed with stone) positives.
As the title says they are 99.9999% finished, I will be touching the sculpts up as I do the flashing, but once the flashing is done they will be molded no matter what!
In my next post I will most likely be showing the silicone appliances out of the mold.
Anyways for now here are the sculpts!
Saturday, December 12, 2009
Monday, December 07, 2009
Sculpt update 2!!!!!!!!!!!!!!!!!! Yes it's been some time...
So though this is the same makeup project from Sculpt update, the sculpt is entirely new! I very much disliked my first attempt, the forms were very unnatural, so I floated it off, did another application of alcote and started all over again. I am much happier with the forms this time around, though there is much to approve upon.
This is the first time doing this large of a multi piece makeup all by myself. I have done fewer piece projects of my own in the past or helped with larger makeup's in the shops, but this is a pretty big task all on your own. It takes many hours, much more than you'd ever think! I have been and still am learning so much from this project, I really look forward to future makeup projects like this as I know exactly how I will go about many things from now on.
So far I have done a rough sculpt, floated it off, made 1630 snaps, remounted the pieces and am now finishing up with final forms and details of the seperate sculpts. I have more or less finished the chin, nose/upper lip and neck. I still have both ears (one's just about done), both cheeks, forehead and back of head to finish.
I hope to get the sculpts finished this week and start the molding next, but we will see! I never know when I have to drop this to do actual paid work instead. I will update with the sculpt pics when all are finished. For now here are some bits of what I've been through so far.
PS: Looking at these pics doesn't really give you a sense of the hours put in so far, but it's many!!!!!!!!!!!!!
Roughed out sculpt.
Monday, October 12, 2009
'Reaper' sculpt from '08
This is a couple shots of a demon arm I sculpted last year at WCT. There was only one arm, it ended up being run in foam latex, seamed by me and Tracy Lai, then finished by Bill Terezakis and Erin Peters with more warts and a paint job.
The arm was for the TV show 'Reaper'.
The arm was for the TV show 'Reaper'.
Saturday, October 03, 2009
This kid rocks out: REMIX!!!!!!!!!!!!
So I was called on once again to apply this makeup. I like the finished result MUCH more than my first time around, the paint is more subtle and the hair work is 1000 times better than the first go. That's due mostly to trimming/styling I go to do this time around.
The pieces (3) were glued on with pros aid, sealed with Green Marble and painted with Illustrator palettes. The hair is hand laid crepe. I also used some Green Marble concentrate for wrinkle stipple on the eyes.
Gelatin demo!
This was a gelatin application demo I did at VFS for the gelatin application class. I liked the finished results so I snapped a couple of pics.
It consists of 2 gelatin nasal labials that came from the same mold as the silicone pieces below. They weren't made for Jon but fit very well!! The left(his) pieces was applied a little to far out, should have been over to the right a bit more.
Was glued on with pros aid and colored with Illustrator palettes.
First silicone makeup from last year.
This was a silicone makeup I did the same day as HD Trauma. It was for the same HD lighting seminar as well. How ever due to time I did not get pics of the finished makeup . These pics were taken by Jamie's(model) girlfriend. I actually didn't get them till more recently, yeah it's been a while, I know!
Anyways, I did an absolutely shit job of tinting the silicone (as you can see), trust me that's not an every day thing, I swear!! I had no color swatch of Jamie when tinting the silicone, apparently I though he was albino....
It consisted of 3 pieces, 2 nasal labial and a neck waddle. It was glued down with Telesis and painted with JOMO alcohol based airbrush colors, plus a little Illustrator here and there. Before paint I also did a latex stretch and stipple on the rest of the neck, this helped the appliance blend in much better!
Over all the paint job is crap, haha, probably one of the worst I have ever done. The application went well though, and to be honest it looked fantastic 20' tall up on the theater screen! (was projected live from an HD camera)
Even though I'm not terribly proud of this makeup, my blog isn't just about all the work I'm proud of, but more my learning experience. This was my first silicone makeup so it seemed right to have it up on here!
Thursday, September 17, 2009
HD SCARING!!
So I did makeup for another HD Lighting seminar for friend and mentor, Stan Edmonds. I originally had planned to do 2 makeup's: gelatin scar and a bondo transfer age makeup. I ended up not getting enough time, with work and everything else, so I was only able to do the gelatin scar.
I sculpted a 3 pieces makeup originally for a caucasian modle (Jon) but ended up having an asian model instean (Pai).
I was actually very pleased with the outcome! The makeup turned out better than I had hoped for and it was a generic fit! It was glued on with pros aid, blended off and finally sealed with Green Marble Selr. I colored it all with Illustrator. The added a touch of matte gel to take down the shine a bit.
For the eyebrow you can see how it was covered over 2/3 in the gluedown pic, I then hand laid hair to to blend the inside of the real brow onto the prosthetic and past it. I love this touch to the makeup!
Sculpt(unfinished and unchahged), prosthetic(note final and different sculpt design) and gluedown.
Finished with flash.
With out flash.
Darker flash.
Subscribe to:
Posts (Atom)


