I have been super busy working at WCT Productions here in Vancouver. I haven't had time to work on any personal projects, thus haven't posted in some time!!
Anyways I have a bit of down time recently and decided to buy a crap load of new materials I don't have much experience with. This includes platsil gel 10 (yes the infamous) for making GFA's using bald cap plastic. I'm also gonna experiment making molds out of TC-1630 for both silicone and gelatin.
I also bought a crap load of pros aide, with wet slide paper and acetate to get even more comfy with the amazing bondo transfer appliances. I have made quite a few of these now, from sculpting them, to molding them and running the molds. I just want to find out the little things I was always curious about ie: how much shrinkage is there, how much should you over sculpt to compensate and to see if using a food dehydrator works as I've heard for speeding the drying process with good results. Also achieving the correct bondo color mix, as it's super tricky since the end color is way different then the wet bondo mix.
So yeah, I'm planing on doing an aging make up with the silicone work, and some cool crazy things with the bondo appliances (not exactly sure yet). The aging make up will even have a tricky mold too! Planning on doing a 2 piece core full neck appliance mold, where the negative is one piece. The make up will include hand appliances as well.
Anyways I hope to have some sculpts up when ever I get crackin and other cool stuff to post soon!
There is some WCT work that I'm pretty proud of, and will be released in theaters soon! Just have to wait and see what it is!! ;)
Friday, April 18, 2008

Friday, January 04, 2008
New scar!! (well sort of)
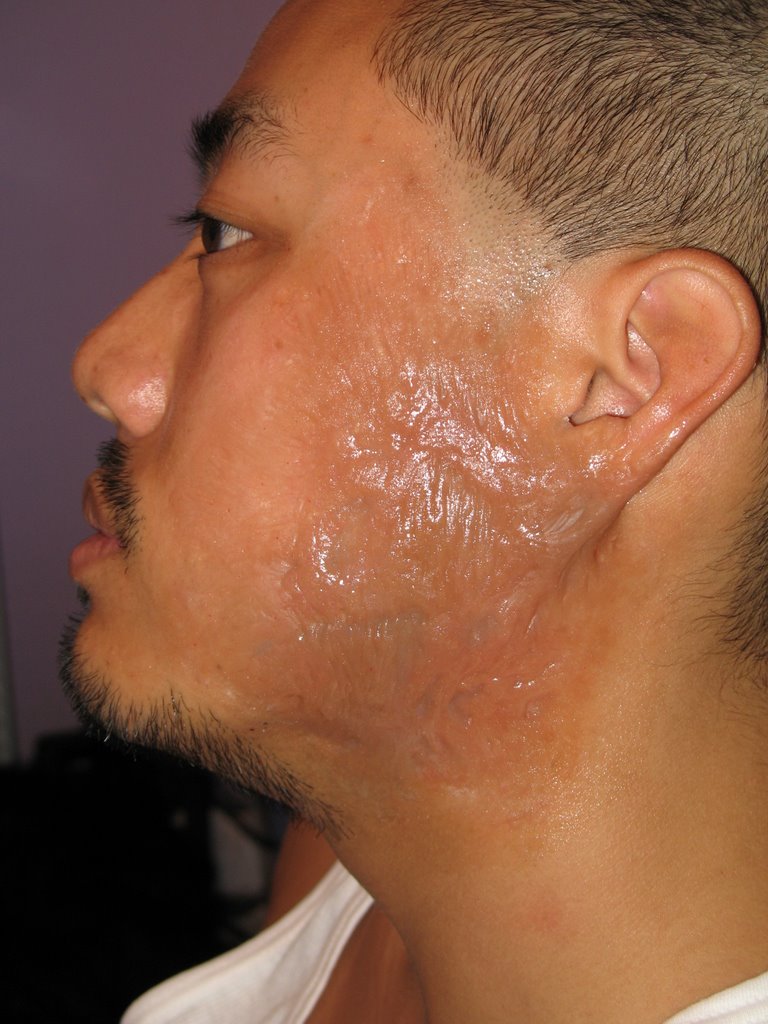
So while working at VFS as a TA I let a student use the scar mold I had to run some foam pieces for herself. In doing so she also ran a copy for me as well!
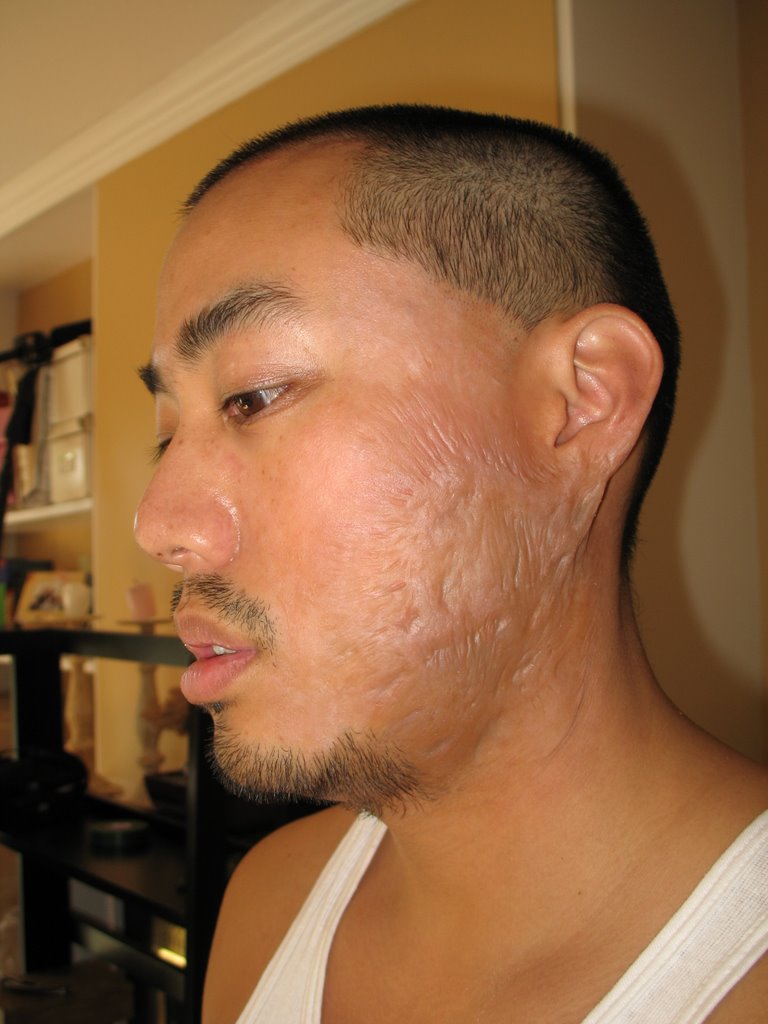
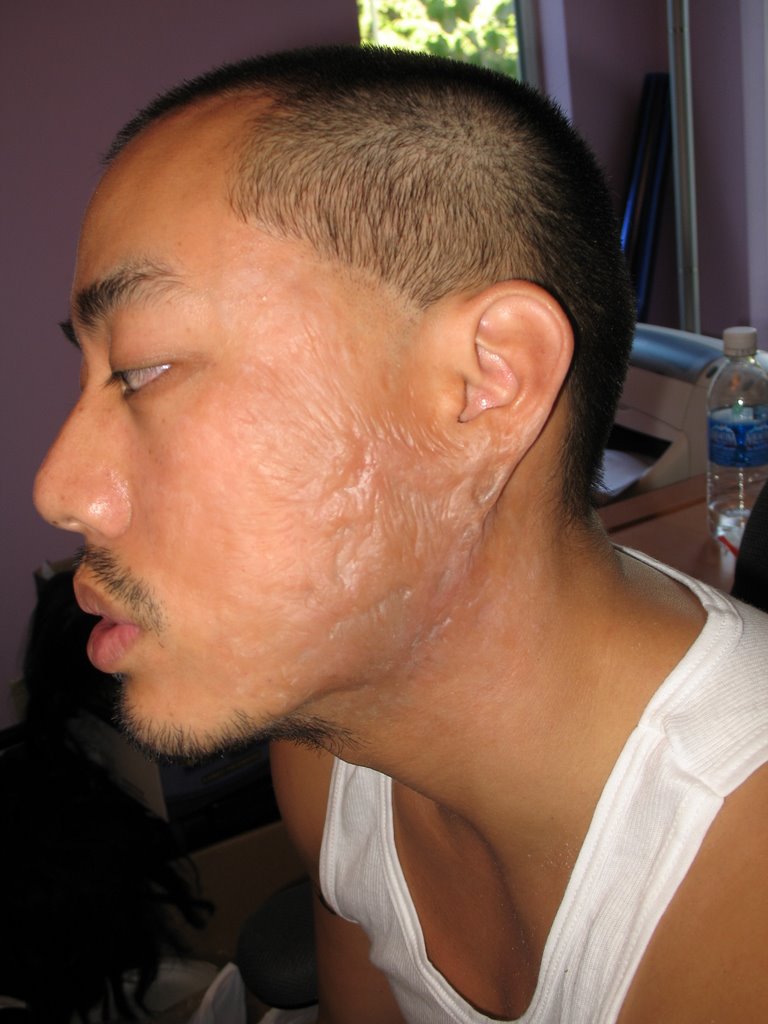
So one day (back in Aug '07) I decided to apply the piece and color it. Now before the foam appliance was glued down I used a piece of nylon, glued and anchored to the upper cheek and side neck, to give the face some tautness, resembling tightened scar tissue. It's not super obvious, but you can see some droop on the outside of the left eye. Next time I use this technique, I know I'll go for a little more pull. Also this foam piece was not made for Natalie, but due to the nature of the piece, it would fit just about anyone quite easily!
The piece was glued down with Beta Bond, and colored with a base Pax wash and then Illustrator colors. I wanted this scar to look more raw and new, compared to the gelatin scar which looked much more healed. There is quite of bit of pinks, reds and purples used. Enjoy!!
So one day (back in Aug '07) I decided to apply the piece and color it. Now before the foam appliance was glued down I used a piece of nylon, glued and anchored to the upper cheek and side neck, to give the face some tautness, resembling tightened scar tissue. It's not super obvious, but you can see some droop on the outside of the left eye. Next time I use this technique, I know I'll go for a little more pull. Also this foam piece was not made for Natalie, but due to the nature of the piece, it would fit just about anyone quite easily!
The piece was glued down with Beta Bond, and colored with a base Pax wash and then Illustrator colors. I wanted this scar to look more raw and new, compared to the gelatin scar which looked much more healed. There is quite of bit of pinks, reds and purples used. Enjoy!!


Saturday, October 27, 2007
Quick post, older material though!
This is was a dislocated compound wrist fracture. It was made for a BC Hydro first aid relay competition at their company event. I sculpted it on a plate mold and ran with gelatin. I first stippled in some latex in the bone section then backed it with pros aide, once the gelatin was poured and cooled, the latex suck nicely to that area, giving the bone a different shade and texture. The finished effect (colored with skin illustrator), I felt turned out excellent for what it was! The guys who saw it were totally in shock, you'd swear it was real!


It's been way too long!
Well I haven't posted on here for over 10 months now!!!! Yes it has been a while, but trust me I have actually been working, no lie!
These latest pics are from work done in a shop here in Vancouver. Both sculpts shown are for the TV series 'Flash Gordon'. The first is deformed leg for the character Renkel. It was seen in a quick shot, and not from the best angle, could barely even tell it was deformed(oh well!). The sculpt had to be done in 2 days, from armature construction to finished sculpt. The over all lay out is pretty cool I think, how ever the sculpt in general could have used at least a good 3 more passes of texture. All in all I like the piece! It was run in gelatin backed with foam. I ended up painting it but have no pics of the paint job.


The second sculpt was done for the same character as well. The sculpt is of a scull plate the guy has on his head. The final plate used in the show ended up being an altered version. The original had a large hole in the plate with a veiny fluid sack bulging out. It also originally covered the left eye brow, but it was felt it may restrict facial expressions so it was cut back. The brain hole was made smaller, and wasn't bulging anymore. It was changed to a see through window with brain matter visible. I used a fast cast resin copy of the original that was cut back and then re sculpted in clay. The piece was colored and finished by Andre Gaul (an amazing artist if I do say so myself!) The sculpt was suppose to look like it was made of metal and have "electronic" designs and engravings. The "3 circle" pattern is also a part of the plot line, though I do not know exactly what it represents. Enjoy!


These latest pics are from work done in a shop here in Vancouver. Both sculpts shown are for the TV series 'Flash Gordon'. The first is deformed leg for the character Renkel. It was seen in a quick shot, and not from the best angle, could barely even tell it was deformed(oh well!). The sculpt had to be done in 2 days, from armature construction to finished sculpt. The over all lay out is pretty cool I think, how ever the sculpt in general could have used at least a good 3 more passes of texture. All in all I like the piece! It was run in gelatin backed with foam. I ended up painting it but have no pics of the paint job.


The second sculpt was done for the same character as well. The sculpt is of a scull plate the guy has on his head. The final plate used in the show ended up being an altered version. The original had a large hole in the plate with a veiny fluid sack bulging out. It also originally covered the left eye brow, but it was felt it may restrict facial expressions so it was cut back. The brain hole was made smaller, and wasn't bulging anymore. It was changed to a see through window with brain matter visible. I used a fast cast resin copy of the original that was cut back and then re sculpted in clay. The piece was colored and finished by Andre Gaul (an amazing artist if I do say so myself!) The sculpt was suppose to look like it was made of metal and have "electronic" designs and engravings. The "3 circle" pattern is also a part of the plot line, though I do not know exactly what it represents. Enjoy!


Saturday, December 30, 2006
Aging...The latest and most advanced!!(Well for me) UPDATE!!!! SCULPT PICS ADDED!!!!
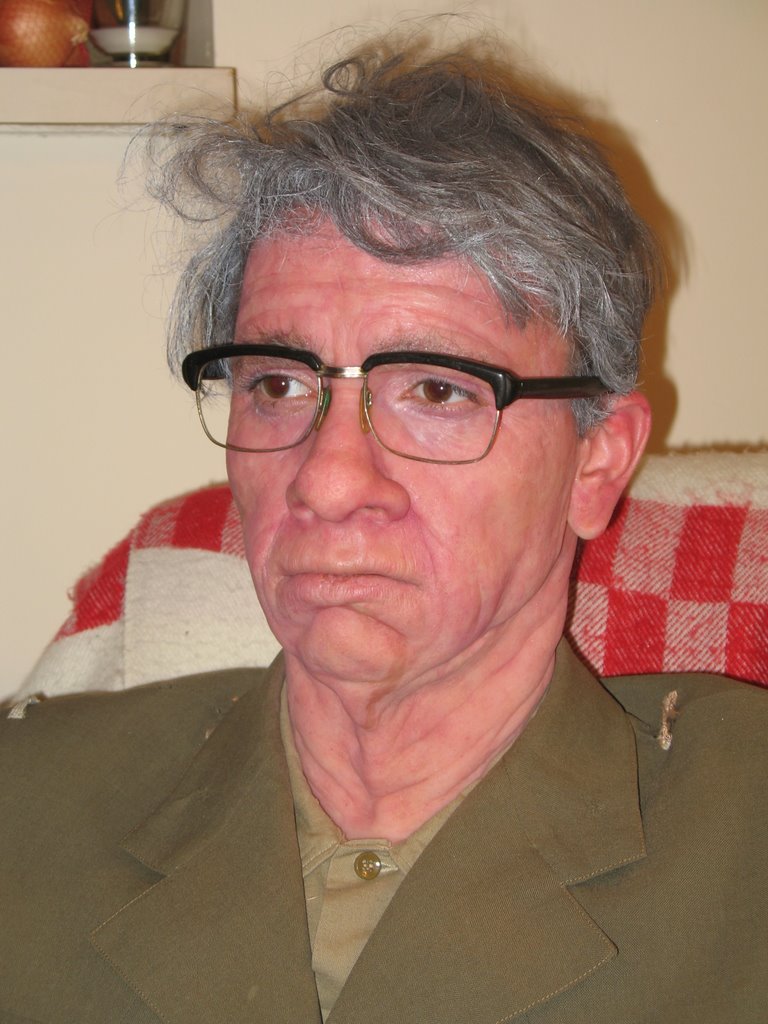
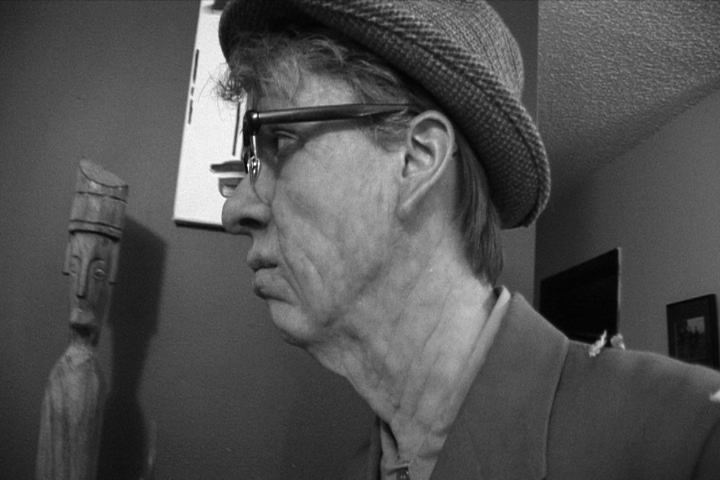
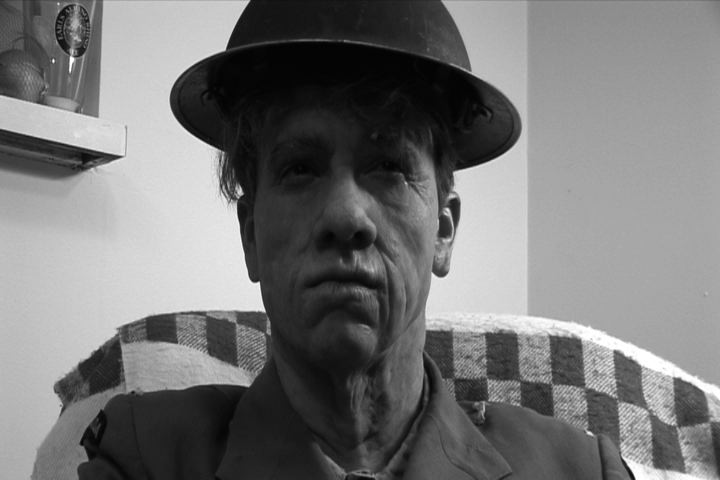
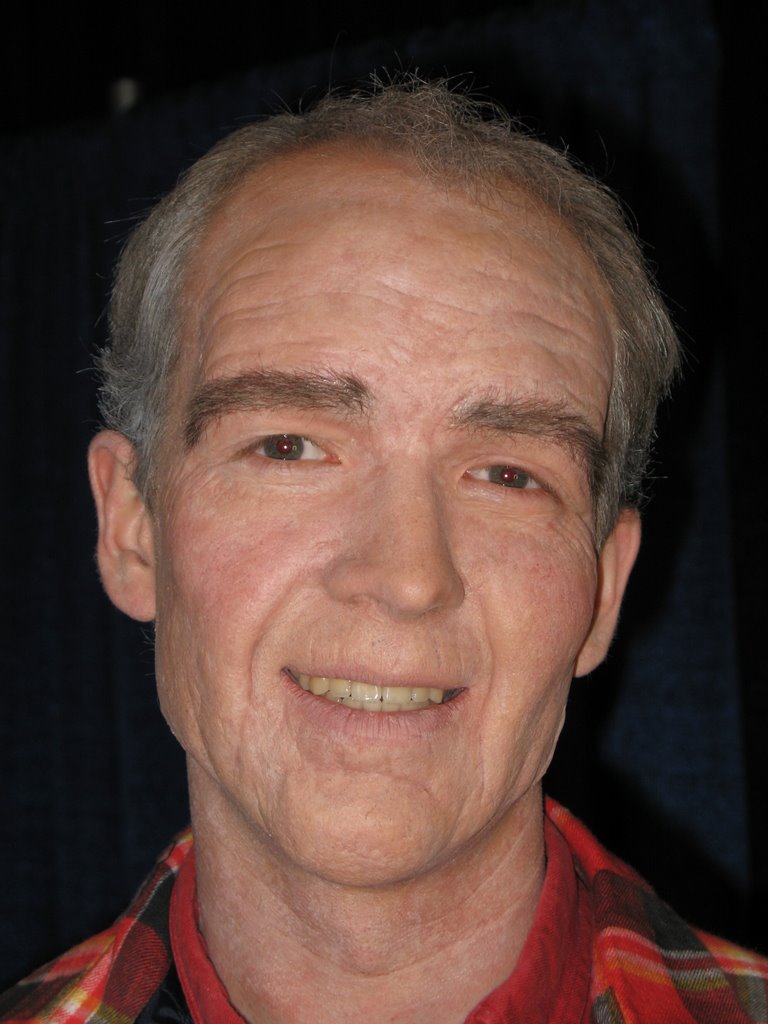
It has been a while since my last post but I'm still trying to keep busy with my make up. This latest make up creation was brought upon by a request. A fellow by the name of Colin Steele contacted me and asked if I would be able to make him look 80 years old. My response..."I'll do my best" So from the first face cast to the final application was a mere 13 days. For this make up I decided I need to go as far as possible with the prosthetics. That said, I figured it was about time I stepped foot into the realm of wrap appliances. Now in order to get a wrap appliance you first need a flared positive. So what you do is, you take your life cast of the face/neck/collar, AKA a 3/4 cast, and you build taper all around it, then basically do another face cast of the corrected(flared) positive. With this corrected face cast you are able to sculpt an appliance that will wrap around the neck and have the blending edges out of view, but because of the flare on the positive you don't need to worry about any undercuts when sculpting.
Now this was my first attempt, and all I can say is it was a complete success, especially in that the flared positive, mold and appliance came out great. In all I created 5 different prosthetics. A forehead piece that covers the brows, a nose/upper lip piece(first), ear lobe extensions(first as well) and the grand daddy cheeks/chin/neck appliance. Basically everything I had to create for this make up was new, not in technique for all but just the type and size of the piece. I had done noses and upper lips before, but not together as a single piece. Ear lobes I had never done before either.
When it came time to pouring the pieces, I soaked the molds in water so that any air bubbles in he molds would be full of water and would release less or no air, and I wouldn't end up with bubbles in the prosthetics. This worked out pretty good though the nose mold was giving me a few problems. I also didn't soak the wrap mold because of its size, its was big, I think I used about 50 lbs of ultra cal 30, in the making of the flared positive and negative. I had to fill a few bubbles in the end, but the pieces were all really workable and with great blending edges.
When I applied the make up I did the nose/lip piece first, then the wrap, then forehead and the ear lobes last. During the wrap application Colin was actually laying down, cause I had no assistant to help me that day. I honestly really liked this technique, he was relaxed and the piece went on with no trouble what so ever. After this he sat back up for the forehead and ear lobes. The worst part of the application was my color job. It wasn't that great, and honestly could have been a lot better. It was ok in the end though due to the fact it was shot in black and white. Actually in person it looked pretty good, but the pics I took(with flash) didn't turn out very well, all the sculpted fine line detail is not visible, and the color job comes off to pink. I think I really need to be less afraid of browns and really incorporate them more. The hair was colored with spray in and some white skin illustrator. The brows were hand laid(not my best), next time I think I might try punching the brows. The brow color was a little off too, could have been more grey.
Anyways the following pics are what I ended up with, I had a great time applying the make up and was really pleased with how all the pieces came together, enjoy!! In the first 2 pics the eyes are photo shopped a bit to look older, and the first is set in a black and white which the film was shot in.


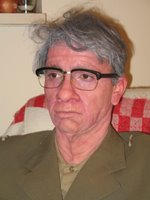
These last 4 are stills from the footage shot. As you can see it turned out quite nicely, the one thing I didn't do was make up on the hands (I know I know, I should have!!) I didn't because you don't see them much or close up, but I wish I had, oh well, next time!
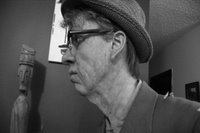
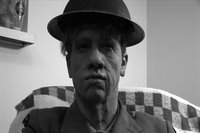

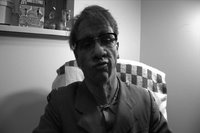


Now this was my first attempt, and all I can say is it was a complete success, especially in that the flared positive, mold and appliance came out great. In all I created 5 different prosthetics. A forehead piece that covers the brows, a nose/upper lip piece(first), ear lobe extensions(first as well) and the grand daddy cheeks/chin/neck appliance. Basically everything I had to create for this make up was new, not in technique for all but just the type and size of the piece. I had done noses and upper lips before, but not together as a single piece. Ear lobes I had never done before either.
When it came time to pouring the pieces, I soaked the molds in water so that any air bubbles in he molds would be full of water and would release less or no air, and I wouldn't end up with bubbles in the prosthetics. This worked out pretty good though the nose mold was giving me a few problems. I also didn't soak the wrap mold because of its size, its was big, I think I used about 50 lbs of ultra cal 30, in the making of the flared positive and negative. I had to fill a few bubbles in the end, but the pieces were all really workable and with great blending edges.
When I applied the make up I did the nose/lip piece first, then the wrap, then forehead and the ear lobes last. During the wrap application Colin was actually laying down, cause I had no assistant to help me that day. I honestly really liked this technique, he was relaxed and the piece went on with no trouble what so ever. After this he sat back up for the forehead and ear lobes. The worst part of the application was my color job. It wasn't that great, and honestly could have been a lot better. It was ok in the end though due to the fact it was shot in black and white. Actually in person it looked pretty good, but the pics I took(with flash) didn't turn out very well, all the sculpted fine line detail is not visible, and the color job comes off to pink. I think I really need to be less afraid of browns and really incorporate them more. The hair was colored with spray in and some white skin illustrator. The brows were hand laid(not my best), next time I think I might try punching the brows. The brow color was a little off too, could have been more grey.
Anyways the following pics are what I ended up with, I had a great time applying the make up and was really pleased with how all the pieces came together, enjoy!! In the first 2 pics the eyes are photo shopped a bit to look older, and the first is set in a black and white which the film was shot in.


These last 4 are stills from the footage shot. As you can see it turned out quite nicely, the one thing I didn't do was make up on the hands (I know I know, I should have!!) I didn't because you don't see them much or close up, but I wish I had, oh well, next time!


I thought I'd add these just cause!
They are the sculpt for the wrap appliance.
They are the sculpt for the wrap appliance.


Monday, October 16, 2006
Personal Project
So as the days go on I hadn't done anything prosthetic wise lately, so I decided I wanted to create a new make up. I had the face cast of a guy named Gabriel Koenig. He played the zombie(make up done by me, pics below) in my friends film 'A Night of Removal'. So I emailed him up and said "Hey I want to create an aging make up for you, is that ok!?", he was fine with it so I got to'er!
I sculpted all the pieces(3) and created a single negative that would produce all of them at once. I made a forehead piece, that covers the eye brows(new brows were hand laid), then an upper lip piece. This piece was so thin, less than a millimeter I believe, I wasn't even sure it would work, but it ended up working beautifully. The last Piece was the cheeks/chin, it blended off just over the edge of the bottom lip and just under the jaw line. They were all made out of PGG and colored with Illustrator pallete. I think this has been my best sculpt and make up to date, the fore head wrinkles looked awesome and creased very realistically when the fore head moved. The nasal labial folds worked nicely too! There was also a bit of latex stipple around the eyes to add wrinkles and blend the pieces in.
I sculpted all the pieces(3) and created a single negative that would produce all of them at once. I made a forehead piece, that covers the eye brows(new brows were hand laid), then an upper lip piece. This piece was so thin, less than a millimeter I believe, I wasn't even sure it would work, but it ended up working beautifully. The last Piece was the cheeks/chin, it blended off just over the edge of the bottom lip and just under the jaw line. They were all made out of PGG and colored with Illustrator pallete. I think this has been my best sculpt and make up to date, the fore head wrinkles looked awesome and creased very realistically when the fore head moved. The nasal labial folds worked nicely too! There was also a bit of latex stipple around the eyes to add wrinkles and blend the pieces in.
Here you see the finished sculpt before I poured the negative.


Gabriel is actually 20, here you see him looking around 55-60 years old. The make up application took just over 4 hours to complete.


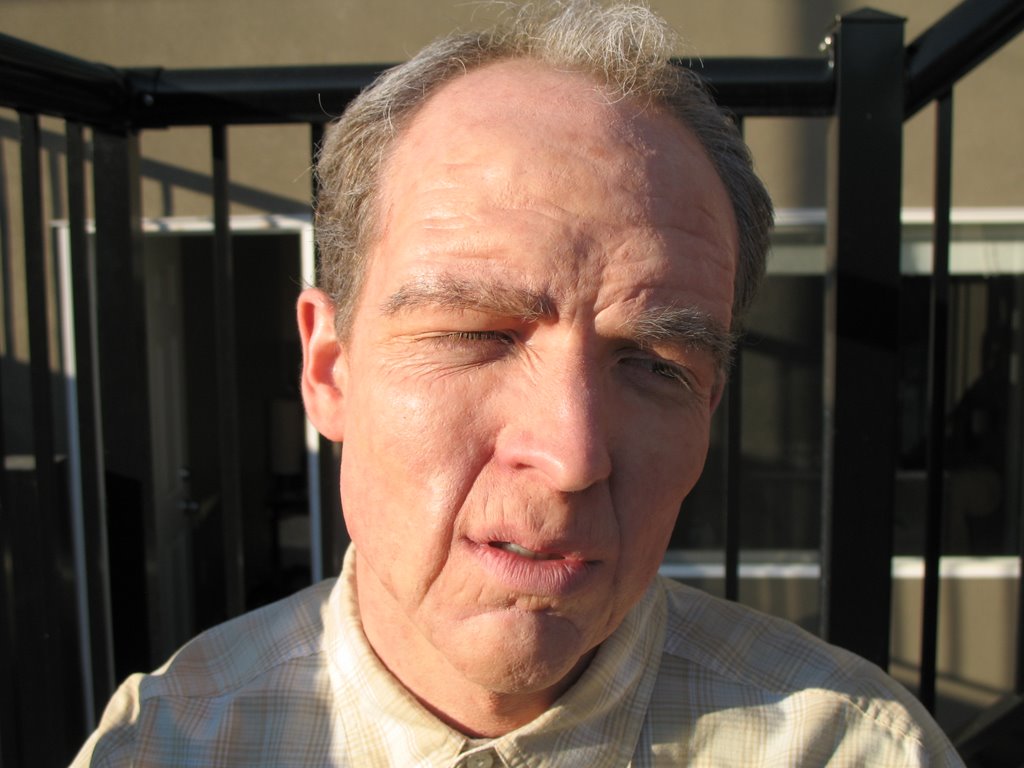
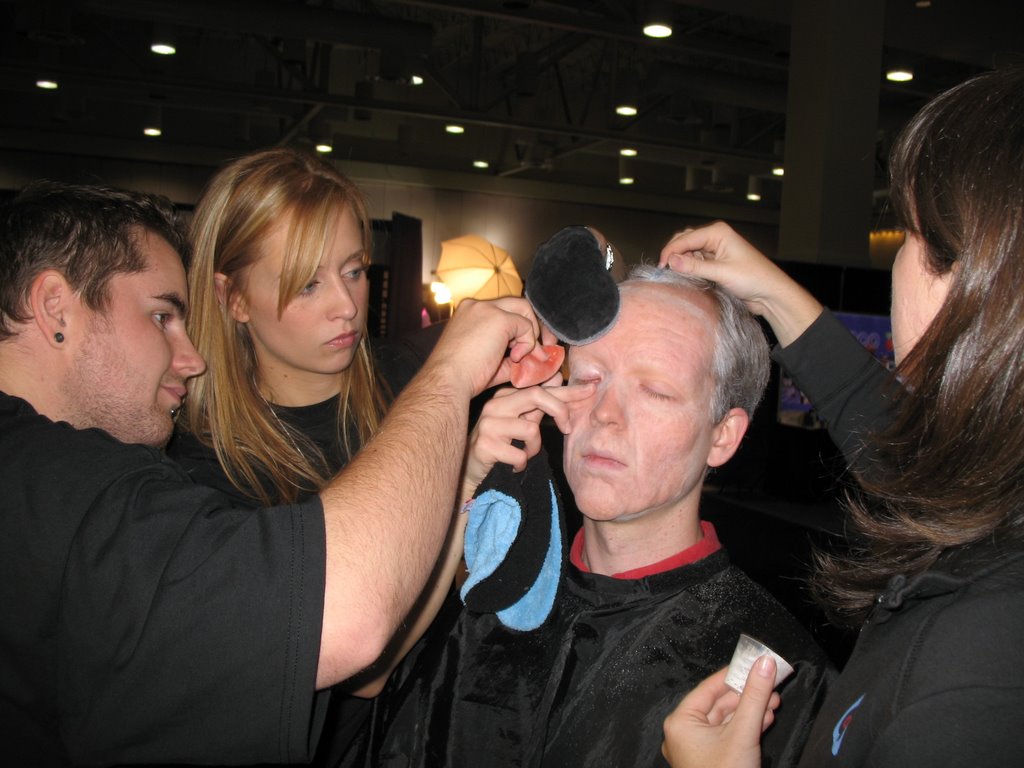
These last 3 pics are of the same make up done the next day believe it or not. I did it for a demo at the FTX representing VFS. I did the make up with the help of a couple VFS make up alumni, Courtney Frey(left) and Amy St. Jean(right, though you can't see her face).
NOTE: This time the make up was completed in just over the 2 hour limit we were given!! I precolored the pieces to save time.
NOTE: This time the make up was completed in just over the 2 hour limit we were given!! I precolored the pieces to save time.

Friday, September 01, 2006
Scaring Results
So for the film 'Are you Sleeping' I ended up applying the scar prosthetic for three days of shooting. They shot over 4 days but the character "Simon" wasn't needed for the first day of filming. It was a one piece prosthetic you saw from the sculpt. It was attached with pros aid and sealed with pros aid as well. I colored the scar using my Illustrator palettes(Skin, FX). Beside the scar I was constantly touching up the sweat effects on Jono(Simon). I had a few problems with the make up over the 3 days, nothing major but things you will constantly run into being a make up artist. The first and most serious one was the sweat. Not the fake sweat I applied, but the real sweat that was slowly ruining the edges of the applied piece. I fixed it up as best I could, not messing with it too much, as I didn't want to further the lifting edges. The second thing that happened was that the coloring was not exactly the same through out the 3 days, though this was minor, cause you don't see the scar close up enough in the 10 minute short to even notice it. The third and final thing was, on the second day the placement of the piece was a little to low, though only noticeable on the ear lobe, and most likely only noticeable if you are looking for such mistakes!!! But all in all it was a great experience, and the most times I have applied the same make up to date!! Oh also on the second day of shooting I ended with me doing some quick gashes(5) across Simons face. This will ended up being the final scene in the film. I really disliked th gashes I was extremely rushed, so I used thick blood to make the cuts, with normal blood running down. I wish I would have taken a bit more time to make the cuts a bit thinner. Less is more!! The one cool thing that worked out was I was able to cut right into the gelatin scar prosthetic to create one of the cuts, though I think in the end it will be so quick it wil be unoticeable.
This was from day one, I liked the color job the most on this day, out of three. Namely the light tones and pinks tones that resemble the loss of skin pigment.





This was from day one, I liked the color job the most on this day, out of three. Namely the light tones and pinks tones that resemble the loss of skin pigment.


This was day two, like I said the placement was a little low, though hopefuly no one will notice!! Also it didn't have the same levels of pink and lighter color that I liked from the day before.

For the final day seen here, the piece was actually precolored before I even applied it. I actually precolored this piece as a color guide for the make up itself, then I ended up running one short(used for the practice application) so I used the precolored for the final days shoot. I don't recommend having just enough pieces, you should always have a back up just incase!! Once it was glued down I did a bit or color blending on the edges.

So even though this was from the second day of shooting, I put these up after the normal looks as it does happen last in the film. You can see the thick blood doesn't look so great but it did the trick, and the director was happy with it.


I added these last 2 pictures just for a different view. The first is an angle from behind the ear so you can see what it looks like back there. The second picture was from the make up from day 3 after I had sealed it with pros aid but not powdered it yet. The result was a very shiny look, I really liked it, and in the future might try to get a shinier look like this, some scaring does look like that.
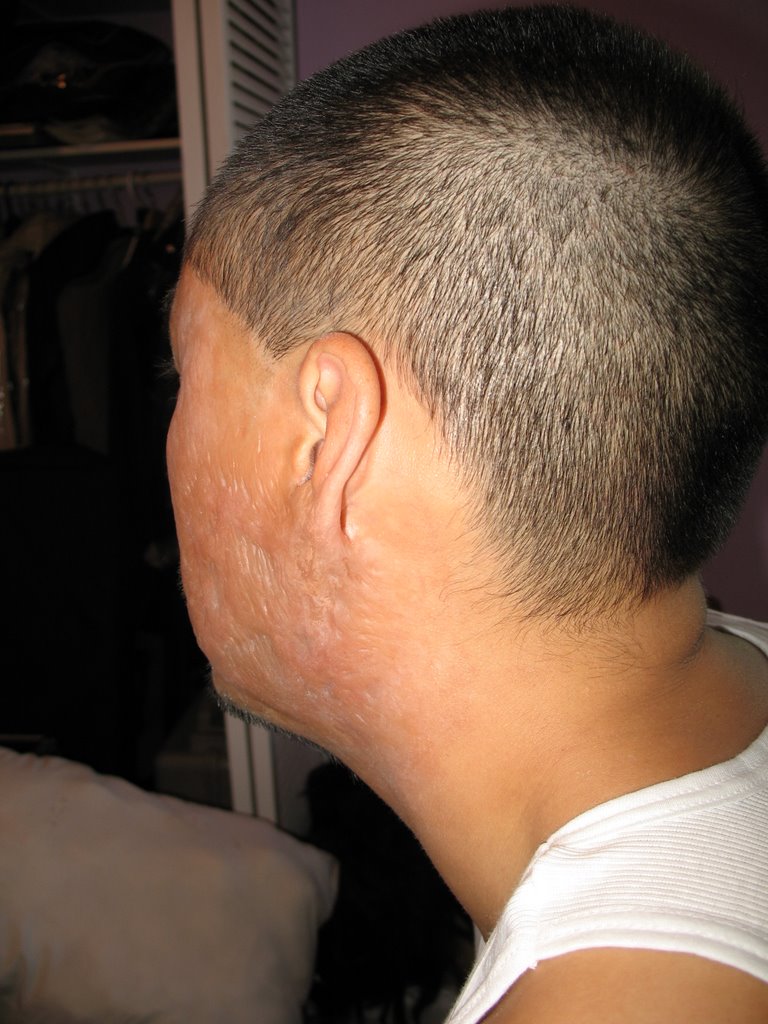
UPDATE!!!: I attended the MAMM this past Sat the 9th of Sept, sadly our movie didn't place in the competition(we got greats reviews from viewers though!!), though we did lose to some great movies. Ours was much darker, the rest had a happy/comedy feel to it. It was a great experience none the less and I hope to collaborate again with the same guys. I for sure want to be apart of the competition again!
Thursday, August 31, 2006
Networking
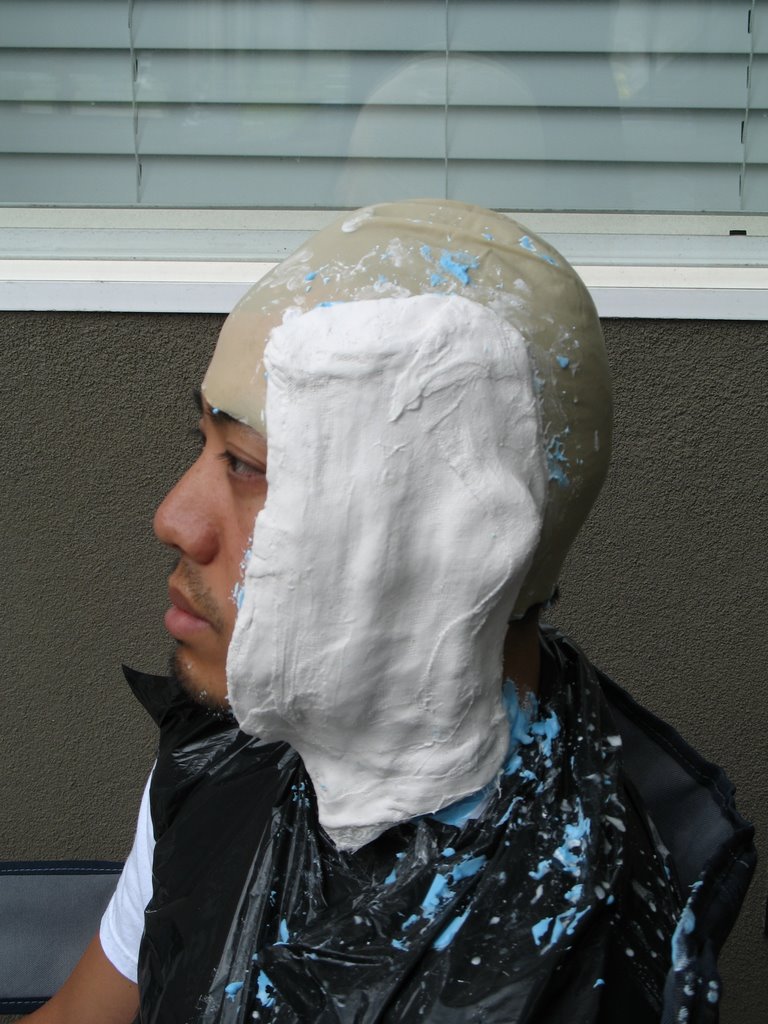
So while working on a VFS student film called 'Per-specs' I met a local actor named Jono Lee. He was a really great guy, super nice and funny as well. While on the shoot I showed him my portfolio, and as a result he asked if I could maybe help out with something he had coming up. He wanted me to do a scar(we later made it a burn scar) of some sort on the side of his face. So I said sure I'd love to and we exchanged cards. I must say you're never really sure if things will progress or just stand still at the first initial talk. But sure enough they did, it ended up that project he wanted me to work on was going to be an entry for a competition held by the Vancouver Asian Film festival. We had a meeting and set a date to do Jono's face cast. Once that was done I went on my way sculpting the piece I would use on him. I ended up sculpting 2 different scars. I did the first and showed Charles Porlier and asked for tips as I always do!! He gave me some great advice, which involved me thinning out the piece/sculpt. In doing so I basicaly removed all the detail I had sculpted. The resculpt was even better and I was extremely please with the outcome. It had a much more realistic look and feel. So for some of you who aren't exactly sure how prosthetics are made. I have posted some the rough stages of creating the piece.
Here you see Jono first with the alginate setting up with some cheese clothe lightly pressed into it. This enables the plaster bandages, which you see in the second picture, that go over top(which give the cast a ridged support) something to grab onto. After the alginate piece is removed a positive is made by pouring Ultracal 30 into the face cast. Once hardened, the alginate and bandages are removed and the positive was put in a Ultracal 30 base. Once this set up I cleaned up the edges a bit and it was ready to sculpt on.

You can see in the pictures here how the ear was completely filled in(with Ultracal 30) and only the ear lobe was exposed(now covered with clay though) with a bit of the outer rim. The one on the left was my first sculpt, as you can see it is quite thick and almost Freddy Kruger like. I wanted it to be more real, and although I did see actual pictures of real scars that were this thick and obvious, the less is more idea seems to always work. So once I removed a lot of the mass I extended the scar even further, though it was much thinner, this gave me a better blending edge, and the scar didn't look like a thick prosthetic just slapped on the face. The piece came out amazingly well, and had great edges for blending! The final result soon to come...


Sunday, August 27, 2006
1 Day job!!
Quickly following the zombie film, a guy named Doug from the same class as Jonny(Director of zombie film) asked me to create a prosthetic that would make it look like this clock was embedded in to the main characters arm. The thing was he brought be the clock the day before he wanted to shoot!! So I had to quickly sculpt a piece that would hold the clock and create the negative mold that same day. The result I actually didn't mind! It was a quick job, but really interesting and a good experience to do. I ended up applying the clock for 2 days in a row, this was the first time I have ever applied the same effect twice. Not to shabby, there was also a bit of hair laying involved, just to replace the hair that was shaved away so the prosthetic would stick with out problems. Try to tell where the fake hair is!?
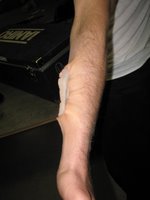

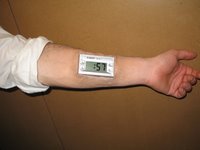
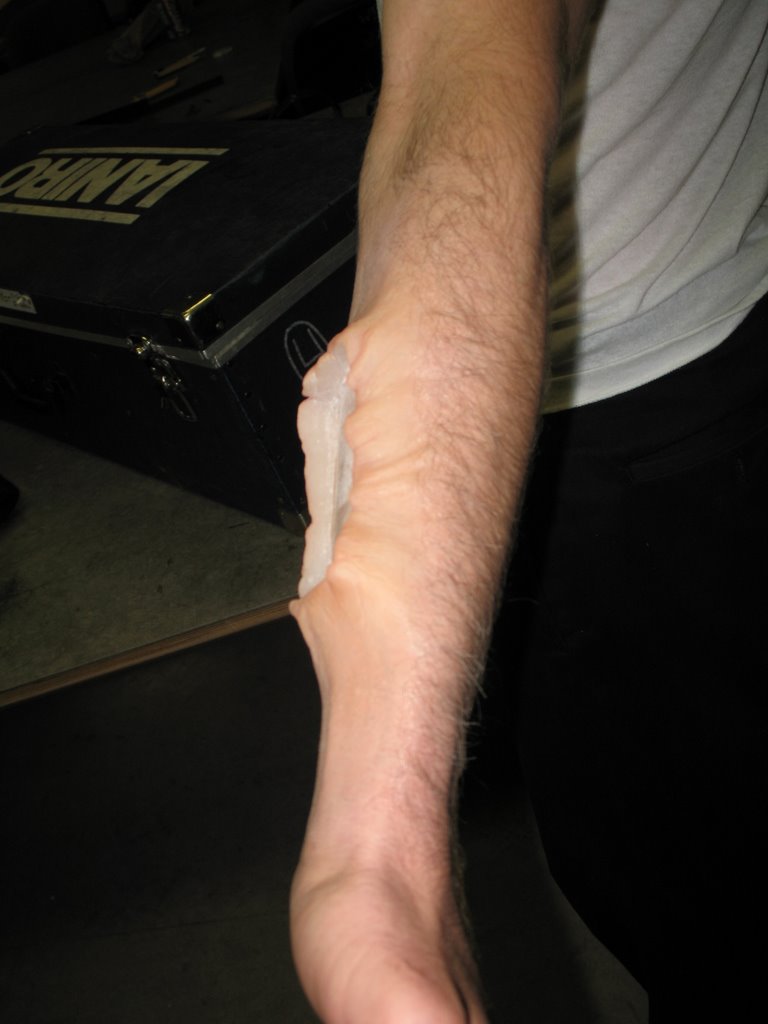


Just a final note, I hate how thick the clock actually was and how much of a slope I had to build to make it look like it was embedded. When he first told me I totally imagined your typical wrist watch with out the straps. Just goes to show how you can envision something completely different than some one else!!!
Subscribe to:
Posts (Atom)